D2C · Launch guide
Launching a D2C Brand in 30 Days
Quick answer
A 30-day D2C store launch is a planning framework for a brand whose product, logo and packaging are already ready. Use days 1–7 for the platform and photography, days 8–14 for pages, payments and shipping, days 15–21 for tools and mobile improvements, and days 22–30 for testing and fixes. Adjust the schedule to your team and integrations.
Launching a Direct-to-Consumer (D2C) brand can feel like an overwhelming endeavour. With the right strategy, tools and mindset, a 30-day plan can help you turn a finished product into a launch-ready online store.
If you’re a founder, CMO, CTO or an aspiring entrepreneur, this guide breaks down the essentials in a straightforward, actionable manner. It assumes you have already finalised your product, logo and packaging; the focus here is building, optimising and testing your store.
Think of your website as your brand’s flagship store. It’s where customers discover your product, learn your story and decide whether to buy. A well-planned launch gives that experience the attention it deserves.
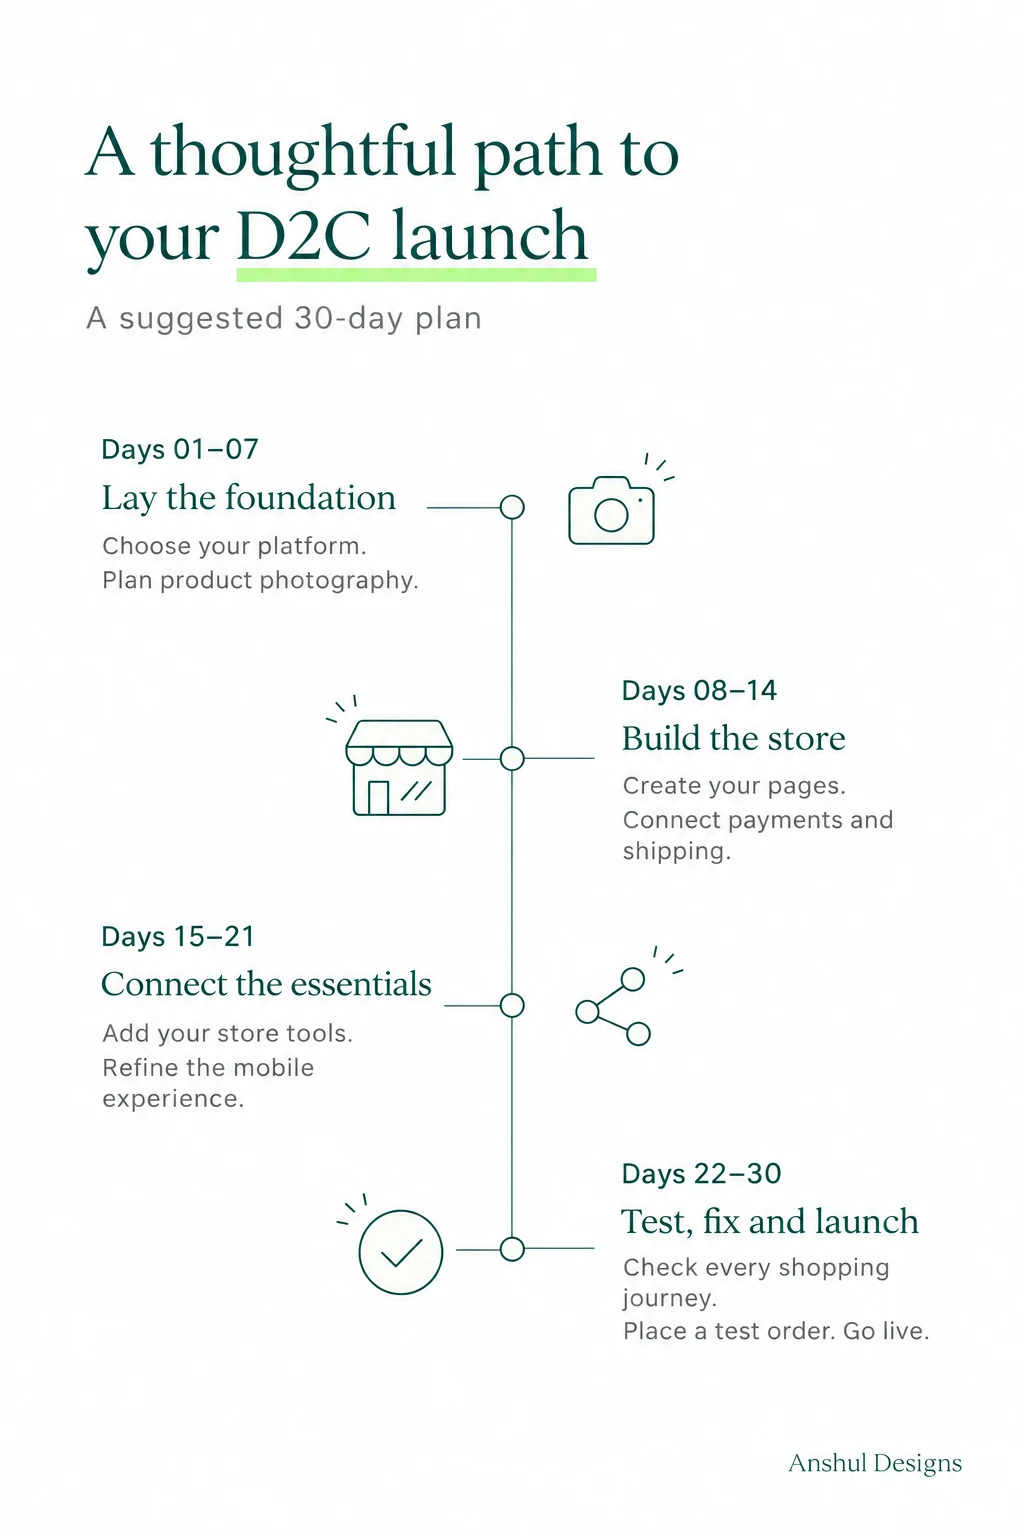
Use the roadmap below as a suggested sequence: days 1–7 for the platform and photography, days 8–14 for pages, payments and shipping, days 15–21 for tools and mobile improvements, and days 22–30 for testing, fixes and launch. Adapt the timing to your product, team and integrations.
01Choosing the right platform
Your e-commerce platform is the backbone of your D2C store. When you’re aiming for a 30-day launch, choosing a platform your team can set up and maintain matters as much as the feature list.
For a straightforward store, Shopify is a practical starting point. Its visual theme editor, hosted setup and app ecosystem help reduce the number of technical decisions you need to make before launch.
- Ease of use: Build and update your storefront without needing to code every change.
- A faster starting point: Use a theme, then configure your catalogue, checkout, payment provider and shipping settings.
- Room to grow: Add integrations as your operations and customer needs become clearer.
WooCommerce offers flexibility, particularly for teams already comfortable with WordPress. It also means planning for hosting, maintenance and the technical work your store requires. Choose based on your team’s skills and the complexity you can realistically manage within the launch window.
02Conducting a high-quality product shoot
First impressions matter, and online shoppers rely on visuals to understand what they’re buying. Clear, consistent product photography helps establish credibility and gives your store a cohesive appearance.
Plan the shoot before you start building pages so the images support the story and layout you want to create.
- Focus on lighting: Natural or soft studio lighting can show your product clearly without harsh distractions.
- Use neutral backgrounds: Keep the product in focus with a clean white or pastel backdrop that fits your brand.
- Include lifestyle shots: Show the product in use so customers can understand its size, context and purpose.
- Capture content for ads: Record useful video clips and variations while the set is ready.
- Start with a moodboard: Align the lighting, backgrounds, styling and shot list with your brand’s aesthetic.
03Perfecting your landing page
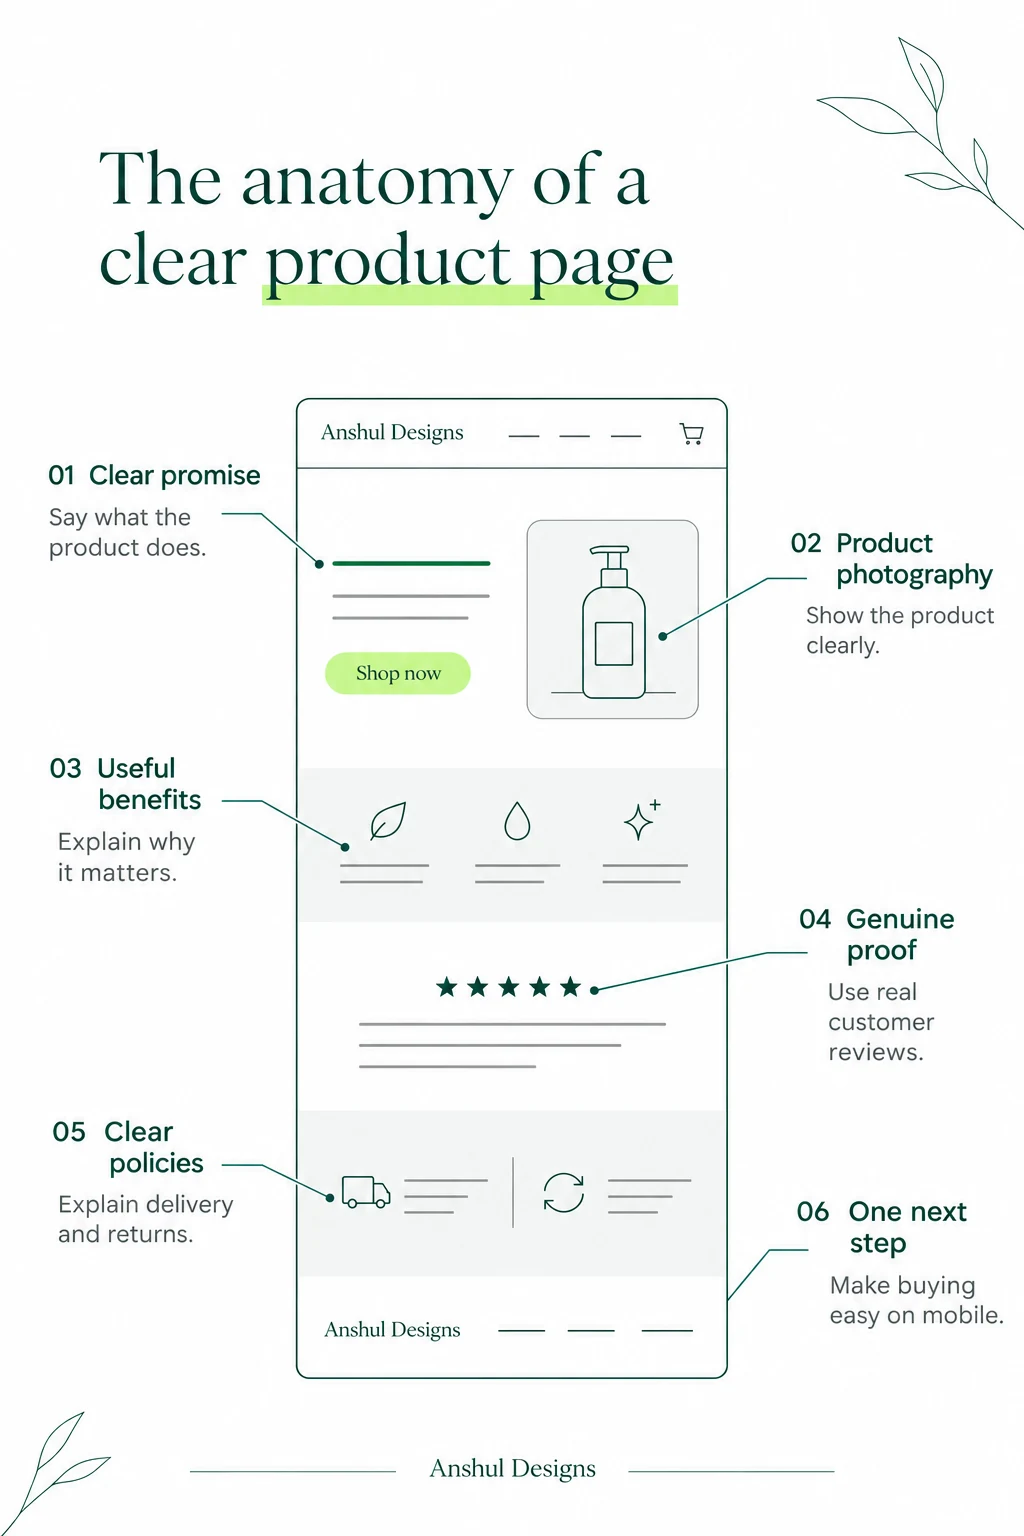
Your landing page may be a customer’s first interaction with your brand. Make it easy to understand the product, find the information needed to decide and take the next step.
- Clear headline and copy: Explain the product’s value in simple language near the top of the page.
- Strong call to action: Give visitors a clear route to purchase or sign up.
- Trust elements: Show genuine customer feedback, clear return policies and relevant, verifiable certifications.
- Mobile optimisation: Keep the page easy to read and use on a phone.
- Fast loading: Optimise images and avoid unnecessary elements that slow the shopping experience.
A good landing page uses clear visuals, simple navigation and visible actions. Clutter, slow loading and missing product or policy information make the decision harder. Review the page as a first-time shopper before adding more sections.
Use the landing-page and product-page scorecards in the free CRO toolkit to make that review more systematic.
04Setting up payment gateways and shipping
A smooth shopping experience needs secure payment processing and reliable delivery options. Set these up early enough to test the full journey before launch.
For an India-focused store, Razorpay and Easebuzz are two payment providers to evaluate. Compare availability for your platform, payment methods, fees, onboarding requirements and support before choosing.
For shipping and fulfilment, consider a logistics provider such as Shipyaari. Check serviceable locations, shipping rates, order tracking, delivery estimates and the integration with your store.
Place test orders yourself. Verify the amount charged, shipping calculation, confirmation messages and order handoff. Make sure the customer can understand what happens after payment.
05Integrating essential Shopify apps and tools
Apps can simplify operations and improve the customer experience. Start with a clear need for each one, check current compatibility and pricing, and test how the tools work together.
- Quick checkout: GoKwik or Razorpay Magic Checkout are options to evaluate for a simpler checkout experience.
- Review collection: Judge.me and Loox can help you request and display customer reviews.
- Analytics: Google Analytics and Microsoft Clarity can help you understand how shoppers use your store.
- WhatsApp communication: QuickReply or Convertway are options to evaluate for customer support and order communication.
- Returns management: Return Prime and EcoReturns are options for organising return and exchange requests.
- Delivery estimates: An app such as Estimated Delivery Date – Plus can help you communicate delivery expectations.
For a closer look at the setup categories, read 7 Essential Setups for Your Shopify Store Before Running Facebook Ads.
06Optimising the mobile experience
Mobile shopping deserves attention throughout the build. A desktop preview alone won’t show whether your product gallery, navigation, forms and checkout are comfortable to use on a phone.
- Check performance: Use PageSpeed Insights to inspect loading performance and identify areas to investigate.
- Make touch interactions comfortable: Check button sizes, spacing, menus, product selectors and form fields.
- Review images and text: Keep product details readable, avoid awkward cropping and check for horizontal scrolling.
- Test the complete journey: Browse a product, choose a variant, add it to the cart and finish checkout on a real phone.
07Testing and QA before launch
Reserve time in your 30-day plan for testing and fixes. A store can look finished while still having broken links, confusing product options or a checkout that fails under real conditions.
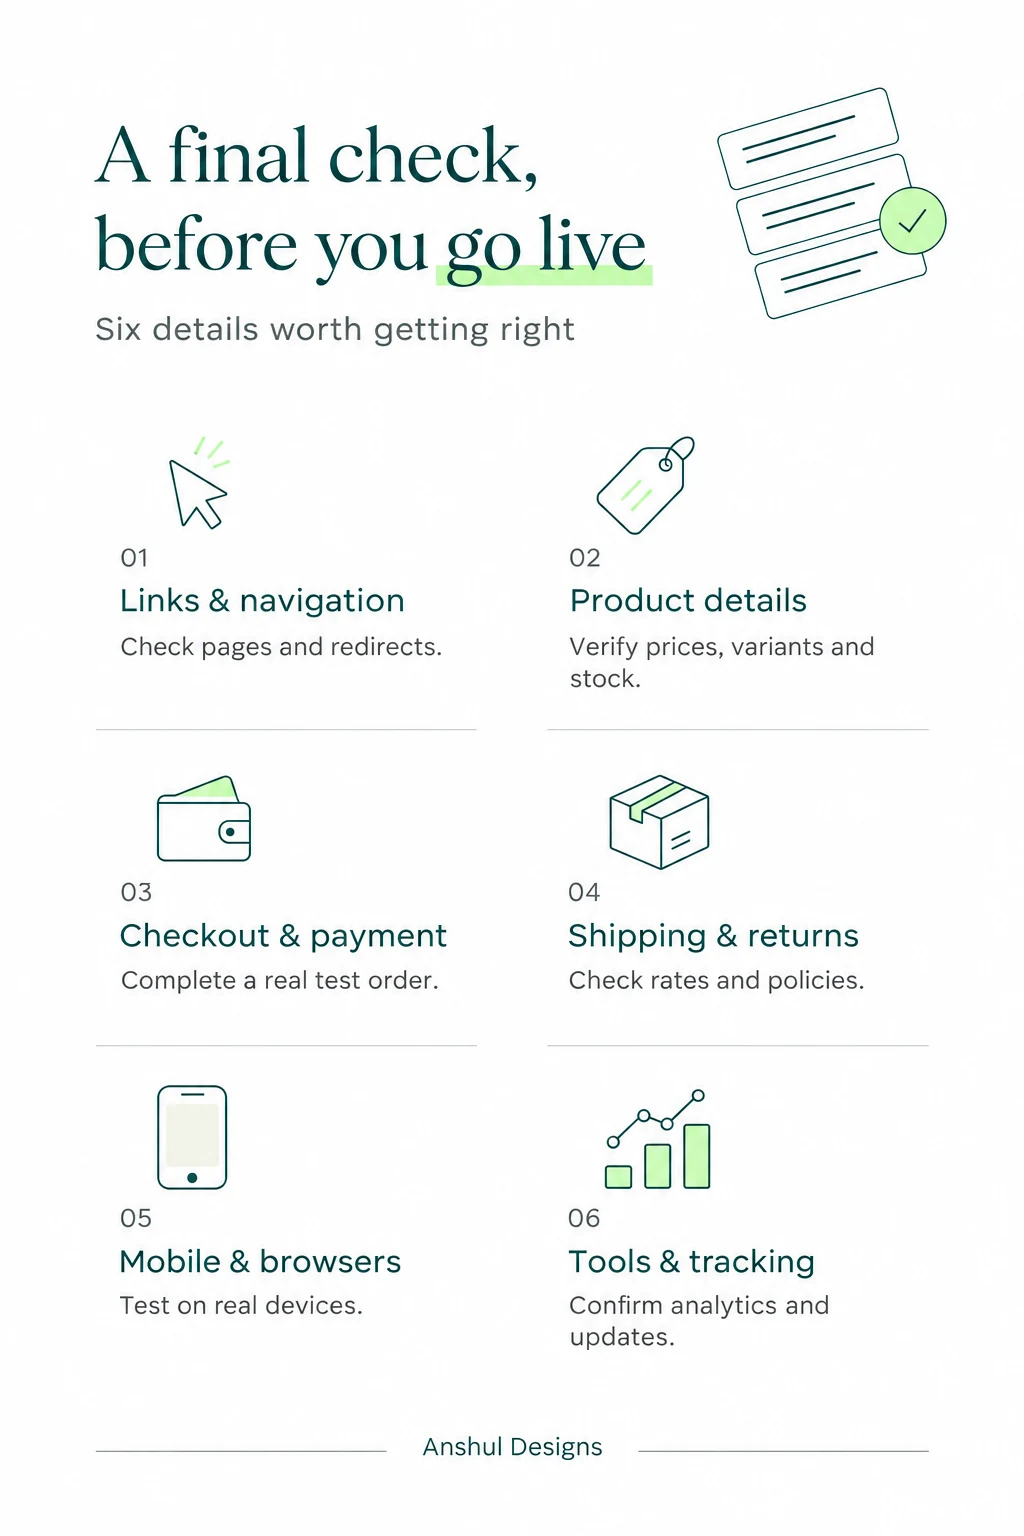
- Test every link and redirect: Check navigation, calls to action, policy links and any URLs you plan to share.
- Verify product details: Review descriptions, prices, images, variants, availability and stock.
- Check the checkout flow: Test the journey from adding a product to receiving the order confirmation.
- Review shipping and returns: Confirm delivery details, shipping charges and return information are clear and consistent.
- Use multiple devices and browsers: Check desktop, mobile and tablet layouts and the browsers your customers use.
- Confirm your tools work: Check analytics, support contact methods and order updates before sending traffic.
Fix the issues you find and repeat the affected journey. Even a small error can frustrate a first-time customer, so leave enough space in the schedule for a second pass.
For an outside review of an existing store, request a free CRO audit. Use the findings alongside your test orders and analytics to prioritise fixes.
Your launch is the beginning
A focused 30-day plan gives you a practical structure for launching your D2C store: choose a platform your team can manage, prepare useful product content, build a clear shopping experience and test the operations behind it.
After launch, keep learning from customers and store behaviour. You can refine your marketing, introduce influencer campaigns and deepen customer relationships over time. For now, work through the checklist and give your store a dependable foundation.
Common questions
Can I launch a D2C brand in 30 days?
You can use 30 days as a target for building and testing an online store when your product, logo and packaging are already prepared. Product development, supplier delays, payment approvals and complex integrations may require a longer schedule.
What should be ready before I start the 30-day plan?
Have a defined product, brand identity, packaging and product information ready. Confirm who owns the store build, photography, payments, fulfilment and customer support so the work can move forward.
What should I test before opening my Shopify store?
Check links, product information, variants, stock, payment, shipping, order notifications and returns information. Complete the purchase journey on mobile and desktop, and verify that your analytics and support tools work.